Based azure virtual machines guide: Ultimate 7-Step Based Azure Virtual Machines Guide for 2024
Welcome to the most comprehensive based azure virtual machines guide you’ll find in 2024. Whether you’re a cloud beginner or a seasoned IT pro, this step-by-step walkthrough will demystify Azure VMs, from setup to optimization—ensuring you get the most out of Microsoft’s powerful cloud infrastructure.


1. Understanding the Core Concept of Based Azure Virtual Machines Guide

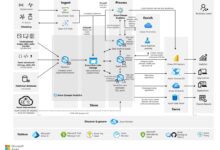
Before diving into deployment or configuration, it’s essential to grasp what Azure Virtual Machines (VMs) truly are and how they fit into the broader cloud computing landscape. This section lays the foundation for the entire based azure virtual machines guide by explaining the core principles, architecture, and value proposition of Azure VMs.
What Are Azure Virtual Machines?
Azure Virtual Machines are on-demand, scalable computing resources provided by Microsoft Azure that allow users to run Windows or Linux operating systems in the cloud. Unlike physical servers, Azure VMs offer flexibility, rapid provisioning, and cost-efficiency through pay-as-you-go pricing.
- They operate as Infrastructure-as-a-Service (IaaS), giving full control over the OS and applications.
- Each VM runs inside a secure, isolated environment within Azure’s global data centers.
- They can be integrated with other Azure services like networking, storage, and security tools.
According to Microsoft’s official documentation, Azure VMs provide enterprise-grade scalability and reliability, making them ideal for everything from dev/test environments to mission-critical production workloads.
Why Use a Based Azure Virtual Machines Guide?
A structured based azure virtual machines guide is crucial because deploying VMs without proper planning can lead to performance bottlenecks, security vulnerabilities, and unnecessary costs. This guide ensures best practices are followed from day one.
- Helps avoid common pitfalls like over-provisioning or misconfigured networks.
- Provides a repeatable process for consistent deployments across teams.
- Aligns with Microsoft’s recommended architecture patterns and compliance standards.
“A well-structured deployment strategy is the backbone of any successful cloud migration.” — Microsoft Azure Architecture Center
2. Planning Your Azure VM Deployment: A Critical Step in the Based Azure Virtual Machines Guide
One of the most overlooked aspects in any based azure virtual machines guide is proper planning. Skipping this phase often results in poor performance, budget overruns, and technical debt. In this section, we’ll walk through the essential planning steps before launching your first VM.
Assessing Workload Requirements
Not all workloads are created equal. Some require high CPU power, while others need massive memory or fast disk I/O. Understanding your application’s needs is the first step in selecting the right VM size and configuration.
- Identify whether your workload is compute-intensive (e.g., batch processing), memory-heavy (e.g., databases), or storage-dependent (e.g., file servers).
- Use tools like Azure Migrate to assess on-premises workloads and recommend suitable VM sizes.
- Consider future growth—plan for scalability from the start.
For example, an SAP HANA database might require an M-series VM with hundreds of GBs of RAM, whereas a simple web server could run efficiently on a B-series burstable VM.
Selecting the Right Region and Availability Zones
Choosing the correct Azure region impacts latency, compliance, and disaster recovery capabilities. A key part of the based azure virtual machines guide involves strategic region selection.
- Pick a region close to your user base to minimize latency.
- Ensure the region supports the VM types and services you need (e.g., GPU instances).
- Leverage Availability Zones for high availability—these are physically separate data centers within a region.
For global applications, consider deploying VMs across multiple regions using Azure Traffic Manager for load distribution and failover.
3. Choosing the Right VM Size and Series in the Based Azure Virtual Machines Guide
Selecting the appropriate VM size is not just about performance—it’s about cost optimization and long-term sustainability. This section of the based azure virtual machines guide breaks down the various VM families and helps you make an informed decision.
Overview of Azure VM Series (A, B, D, E, F, G, etc.)
Azure offers a wide range of VM series tailored for different use cases. Familiarizing yourself with these options is vital for effective resource allocation.
- A-series: Entry-level VMs for dev/test and low-demand applications.
- B-series: Burstable VMs ideal for workloads with intermittent traffic (e.g., small websites).
- D-series: General-purpose VMs with balanced CPU-to-memory ratios, perfect for most enterprise apps.
- E-series: Memory-optimized for heavy database workloads (e.g., SQL Server).
- F-series: Compute-optimized for CPU-intensive tasks like batch processing.
- G-series: High-performance VMs with large memory and SSD storage.
- H-series: Designed for high-performance computing (HPC) and MPI-based applications.
- N-series: GPU-optimized for machine learning, rendering, and AI workloads.
You can explore the full list and compare specs at Azure VM pricing page.
How to Match VM Size to Your Workload
The key to cost efficiency is matching VM size precisely to workload demands. Oversizing leads to wasted money; undersizing causes performance issues.
- Start small and scale up using Azure Monitor to track CPU, memory, and disk usage.
- Use Azure Advisor for personalized recommendations on right-sizing.
- Consider VM scale sets for auto-scaling based on demand.
“Right-sizing VMs can reduce cloud costs by up to 60% without sacrificing performance.” — Microsoft Azure Cost Management Report
4. Setting Up Your First VM: A Step-by-Step Based Azure Virtual Machines Guide
Now that you’ve planned and selected the right VM, it’s time to deploy. This section of the based azure virtual machines guide walks you through creating your first Azure VM using the Azure Portal, CLI, and ARM templates.
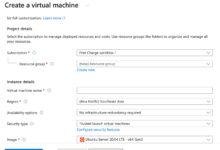
Creating a VM via Azure Portal (GUI Method)
The Azure Portal provides a user-friendly interface for beginners to launch VMs quickly.
- Log in to Azure Portal and click “Create a resource” > “Virtual Machine”.
- Choose your subscription and resource group (create a new one if needed).
- Select a region and VM name.
- Pick an image (Windows Server, Ubuntu, CentOS, etc.) from Azure Marketplace.
- Choose the VM size based on your earlier assessment.
- Configure authentication: SSH key for Linux or password for Windows.
- Set up networking—assign a virtual network, subnet, public IP, and NSG rules.
- Review and create the VM.
The entire process takes about 5–10 minutes. Once deployed, you can connect via RDP (Windows) or SSH (Linux).
Automating Deployment with Azure CLI
For repeatable and scriptable deployments, the Azure CLI is a powerful alternative. This method is especially useful in the based azure virtual machines guide for DevOps teams.
- Install the Azure CLI on your local machine or use Azure Cloud Shell.
- Run the following command to create a Linux VM:
az vm create
  --resource-group MyResourceGroup
  --name MyVM
  --image UbuntuLTS
  --admin-username azureuser
  --generate-ssh-keys
This single command provisions the VM, configures networking, and sets up SSH access. You can extend this with custom scripts, data disks, and tags.
Infrastructure as Code: Using ARM Templates
For enterprise-grade deployments, use Azure Resource Manager (ARM) templates to define your VM infrastructure in JSON format. This aligns perfectly with the based azure virtual machines guide’s emphasis on consistency and automation.
- Define VM properties, networking, storage, and extensions declaratively.
- Deploy using PowerShell or CLI:
az deployment group create --template-file vm-template.json. - Version-control your templates in Git for auditability and rollback.
Microsoft provides hundreds of sample ARM templates to get you started.
5. Configuring Networking and Security in the Based Azure Virtual Machines Guide
Networking and security are often underestimated in cloud deployments. This section of the based azure virtual machines guide ensures your VMs are both accessible and protected.
Understanding Virtual Networks (VNet) and Subnets
Azure Virtual Network (VNet) is the fundamental building block for private connectivity in Azure.
- Each VM must be deployed within a VNet and assigned to a subnet.
- VNets enable isolation, segmentation, and secure communication between resources.
- You can connect VNets across regions using Virtual Network Peering or via VPN/ExpressRoute to on-premises networks.
Best practice: Create separate subnets for web, app, and database tiers to enforce network segmentation.
Securing VMs with Network Security Groups (NSGs)
NSGs act as virtual firewalls, controlling inbound and outbound traffic to your VMs.
- Create NSG rules to allow only necessary ports (e.g., 80, 443, 3389 with restrictions).
- Deny all traffic by default and explicitly allow required connections.
- Apply NSGs at the subnet or NIC level for granular control.
For example, block RDP (port 3389) from the internet and only allow it through a Jumpbox or Azure Bastion for enhanced security.
Using Azure Bastion for Secure Access
Azure Bastion provides secure, browser-based RDP/SSH access to VMs without exposing public IPs.
- Eliminates the need for public IP addresses on VMs.
- Integrates with Azure AD and MFA for identity-based access control.
- Logs all sessions for auditing and compliance.
Deploy Bastion in the same VNet as your VMs for seamless access. Learn more at Azure Bastion documentation.
6. Managing Storage and Disks in the Based Azure Virtual Machines Guide
Storage is a critical component of VM performance and durability. This section of the based azure virtual machines guide dives into disk types, caching, and backup strategies.
Types of Azure Managed Disks
Azure Managed Disks simplify disk management by handling storage accounts behind the scenes.
- Standard HDD: Cost-effective for dev/test and non-critical workloads.
- Standard SSD: Balanced performance for production apps with predictable costs.
- Premium SSD: High-performance, low-latency disks for I/O-intensive applications.
- Ultra Disk: Designed for extreme workloads like SAP HANA or high-frequency trading systems.
You can mix disk types on a single VM—e.g., OS disk on Premium SSD, data disk on Standard HDD.
Disk Caching and Performance Tuning
Azure allows you to configure disk caching to improve performance.
- ReadOnly: Ideal for read-heavy workloads (e.g., web servers).
- ReadOnly + Write: Best for general-purpose VMs.
- None: Required for clustered applications like SQL Server Always On (to avoid cache coherency issues).
Always align caching settings with your application’s I/O pattern. Misconfiguration can lead to data inconsistency.
Backup and Disaster Recovery Strategies
Never assume VMs are safe without backups. Azure Backup provides automated, encrypted, and geo-redundant backup for VMs.
- Enable backup via the Azure Portal or PowerShell.
- Set retention policies (daily, weekly, monthly).
- Test restores regularly to ensure recoverability.
- Use Azure Site Recovery for full disaster recovery and failover to another region.
Learn more at Azure Backup documentation.
7. Monitoring, Scaling, and Cost Optimization in the Based Azure Virtual Machines Guide
Deployment is just the beginning. This final section of the based azure virtual machines guide focuses on keeping your VMs running efficiently, securely, and cost-effectively over time.
Monitoring VM Performance with Azure Monitor
Azure Monitor collects metrics, logs, and alerts to give you full visibility into VM health.
- Track CPU, memory, disk I/O, and network usage in real time.
- Set up alerts for high CPU or low disk space.
- Use Log Analytics to run advanced queries and detect anomalies.
- Visualize data with custom dashboards.
Enable the Monitoring Agent (MMA) or use the newer Azure Monitor Agent for enhanced data collection.
Auto-Scaling VMs with Scale Sets
For variable workloads, manually managing VMs is inefficient. Azure Virtual Machine Scale Sets (VMSS) automate scaling based on demand.
- Define rules to add or remove VMs based on CPU usage, queue length, or schedule.
- Integrate with Azure Load Balancer for traffic distribution.
- Use custom scripts or images for consistent configuration across instances.
This is especially useful for web applications with traffic spikes. Learn more at Azure VMSS documentation.
Cost Optimization Best Practices
Cloud costs can spiral if not managed proactively. This based azure virtual machines guide emphasizes financial discipline.
- Use Reserved Instances for steady-state workloads—save up to 72% compared to pay-as-you-go.
- Leverage Spot VMs for fault-tolerant, non-critical workloads (e.g., batch jobs).
- Shut down non-production VMs during off-hours using Azure Automation or Scheduled Start/Stop.
- Regularly review Azure Cost Management + Billing reports.
- Delete unused disks, NICs, and public IPs to avoid ‘orphaned resource’ charges.
“Organizations that implement cost governance save an average of 35% on their Azure bills.” — Microsoft Azure Cost Optimization Study 2023
What is a based azure virtual machines guide?
A based azure virtual machines guide is a structured, step-by-step resource that helps users understand, deploy, manage, and optimize virtual machines on Microsoft Azure. It covers everything from initial planning to advanced automation and cost control.
How do I choose the right VM size?
Select the VM size based on your workload’s CPU, memory, and disk requirements. Use Azure Advisor and Monitor to analyze usage and right-size VMs. Start small and scale as needed.
Can I automate VM deployment?
Yes, you can automate VM deployment using Azure CLI, PowerShell, or Infrastructure-as-Code tools like ARM templates and Terraform. Automation ensures consistency, reduces errors, and speeds up provisioning.
How do I secure my Azure VMs?
Secure your VMs by using Network Security Groups (NSGs), disabling public RDP/SSH access, using Azure Bastion, enabling disk encryption, and applying regular OS updates. Integrate with Azure Security Center for continuous monitoring.
What are the cost-saving options for Azure VMs?
You can save costs by using Reserved Instances for long-term workloads, Spot VMs for interruptible tasks, shutting down non-production VMs, and right-sizing underutilized instances. Azure Cost Management tools help track and optimize spending.
The based azure virtual machines guide you’ve just explored is your roadmap to mastering Azure VMs in 2024. From understanding core concepts to deploying, securing, and optimizing VMs, each step is designed to build your confidence and competence in cloud infrastructure. By following this guide, you’re not just launching virtual machines—you’re building a scalable, secure, and cost-efficient cloud environment. Whether you’re migrating on-premises servers or developing new cloud-native applications, Azure VMs provide the flexibility and power you need. Start applying these principles today, and take full control of your cloud journey.
Further Reading: